RESTHeart with FerretDB: a tutorial
Introduction
This tutorial introduces FerretDB, an open-source alternative to MongoDB built on PostgreSQL. It demonstrates how to set up the FerretDB stack using Docker and interact with it using RESTHeart, a powerful API server for MongoDB.
The guide covers creating databases, populating collections, querying, and updating documents. It provides an efficient and compatible MongoDB-like experience while leveraging the benefits of PostgreSQL for storage and management.
2025-01-31: updated for FerretDB v2.
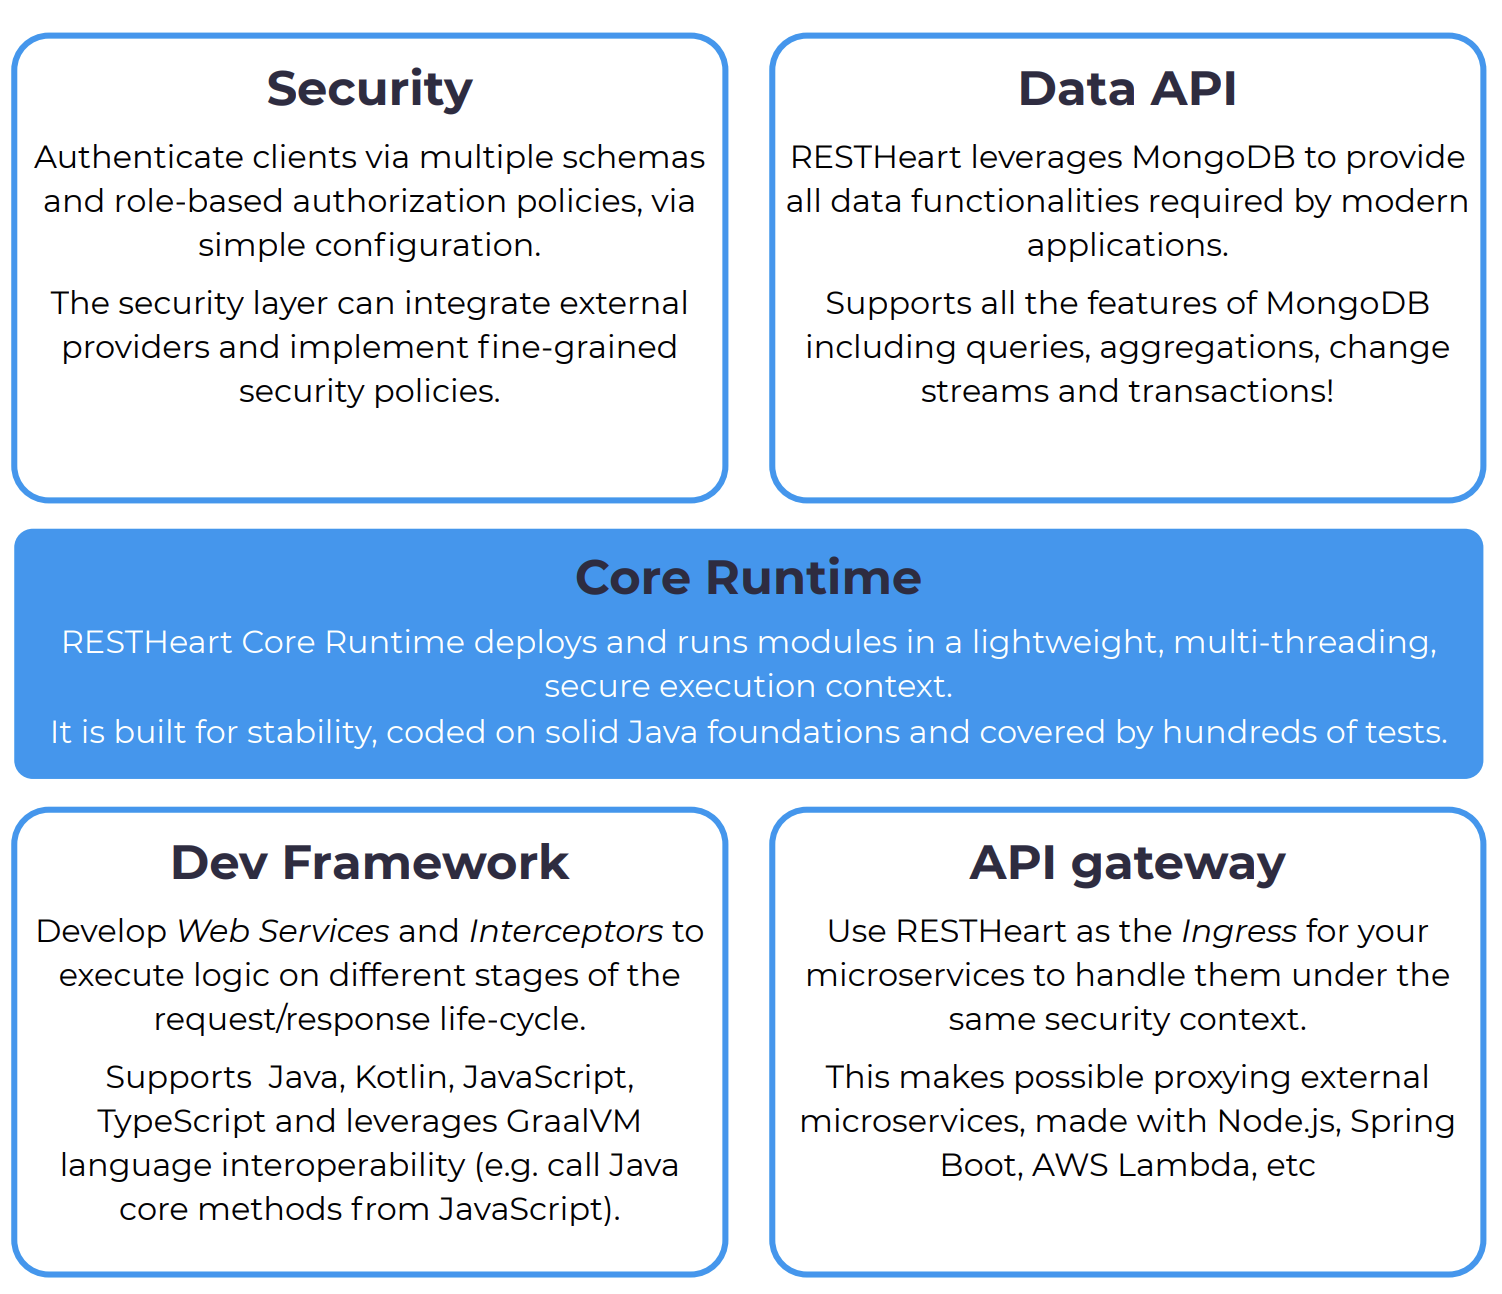
RESTHeart's Main Features
The following picture illustrates RESTHeart's main features:
 {width=90%}
Tutorial
The subsequent steps will guide you in experimenting with RESTHeart's REST API on top of FerretDB + PostgreSQL, as an alternative to a typical MongoDB instance. This is facilitated by RESTHeart's ability to automatically provide REST (and GraphQL) APIs on top of any MongoDB-compatible database.
1. Run the Necessary Services
The quickest way to initiate the software stack is by utilizing Docker Compose.
To launch the software stack and execute the tutorial from the command line, you will need:
- httpie - A simple yet powerful command-line HTTP and API testing client for the API era.
- Docker for your operating system.
Let's begin by creating the following docker-compose.yml file:
services:
  postgres:
    image: ghcr.io/ferretdb/postgres-documentdb:16
    environment:
      POSTGRES_USER: username
      POSTGRES_PASSWORD: password
      POSTGRES_DB: postgres
    volumes:
      - ./data:/var/lib/postgresql/data

  ferretdb:
    image: ghcr.io/ferretdb/ferretdb:2
    restart: on-failure
    ports:
      - 27017:27017
    environment:
      FERRETDB_POSTGRESQL_URL: postgres://username:password@postgres:5432/postgres

  restheart:
    image: softinstigate/restheart
    environment:
      RHO: >
        /mclient/connection-string->"mongodb://username:password@ferretdb/ferretdb"; /http-listener/host->"0.0.0.0";
    depends_on:
      ferretdb:
        condition: service_healthy
    ports:
      - "8080:8080"

networks:
  default:
    name: ferretdb
Navigate to the folder containing the docker-compose.yml file and start the services with:
docker-compose up -d
Then tail the logs with docker-compose logs -f restheart, and it will display something similar to the following output:
$ docker-compose logs -f restheart

restheart-1  | 17:09:05.800 [main] INFO  org.restheart.Bootstrapper - Starting RESTHeart instance default
restheart-1  |  17:09:05.802 [main] INFO  org.restheart.Bootstrapper - Version 8.3.1
restheart-1  |  17:09:05.839 [main] INFO  org.restheart.Bootstrapper - Logging to console with level INFO
restheart-1  |  17:09:05.852 [main] INFO  o.r.configuration.Configuration - Overriding configuration from environment variable RHO
restheart-1  |  17:09:05.859 [main] INFO  o.r.configuration.Configuration -  /mclient/connection-string -> mongodb://username:**********@ferretdb/ferretdb
restheart-1  |  17:09:05.860 [main] INFO  o.r.configuration.Configuration -  /http-listener/host -> 0.0.0.0
restheart-1  |  17:09:05.875 [main] INFO  o.restheart.plugins.PluginsScanner - Found plugin jar /opt/restheart/plugins/restheart-security.jar
restheart-1  |  17:09:05.876 [main] INFO  o.restheart.plugins.PluginsScanner - Found plugin jar /opt/restheart/plugins/restheart-polyglot.jar
restheart-1  |  17:09:05.877 [main] INFO  o.restheart.plugins.PluginsScanner - Found plugin jar /opt/restheart/plugins/restheart-graphql.jar
restheart-1  |  17:09:05.878 [main] INFO  o.restheart.plugins.PluginsScanner - Found plugin jar /opt/restheart/plugins/restheart-mongoclient-provider.jar
restheart-1  |  17:09:05.879 [main] INFO  o.restheart.plugins.PluginsScanner - Found plugin jar /opt/restheart/plugins/restheart-mongodb.jar
restheart-1  |  17:09:05.880 [main] INFO  o.restheart.plugins.PluginsScanner - Found plugin jar /opt/restheart/plugins/restheart-metrics.jar
restheart-1  |  17:09:05.924 [main] INFO  o.restheart.plugins.PluginsScanner - Scanning jars for plugins started
restheart-1  |  17:09:06.519 [main] INFO  o.restheart.plugins.PluginsScanner - Scanning jars for plugins completed in 595 msec
restheart-1  |  17:09:07.052 [main] INFO  o.r.mongodb.MongoClientSingleton - Connecting to MongoDB...
restheart-1  |  17:09:07.336 [main] INFO  o.r.mongodb.MongoClientSingleton - MongoDB version 7.0.77
restheart-1  |  17:09:07.352 [main] WARN  o.r.mongodb.MongoClientSingleton - MongoDB is a standalone instance.
restheart-1  |  17:09:07.363 [main] WARN  o.r.polyglot.PolyglotDeployer - Not running on GraalVM, polyglot plugins deployer disabled!
restheart-1  |  17:09:07.772 [main] INFO  org.restheart.mongodb.MongoService - URI / bound to MongoDB resource /restheart
restheart-1  |  17:09:07.834 [main] INFO  org.restheart.Bootstrapper - HTTP listener bound at 0.0.0.0:8080
restheart-1  |  17:09:07.852 [main] INFO  org.restheart.Bootstrapper - URI / bound to service mongo, secured: true, uri match PREFIX
restheart-1  |  17:09:07.855 [main] INFO  org.restheart.Bootstrapper - URI /graphql bound to service graphql, secured: true, uri match PREFIX
restheart-1  |  17:09:07.856 [main] INFO  org.restheart.Bootstrapper - URI /metrics bound to service metrics, secured: true, uri match PREFIX
restheart-1  |  17:09:07.856 [main] INFO  org.restheart.Bootstrapper - URI /ic bound to service cacheInvalidator, secured: false, uri match PREFIX
restheart-1  |  17:09:07.857 [main] INFO  org.restheart.Bootstrapper - URI /csv bound to service csvLoader, secured: true, uri match PREFIX
restheart-1  |  17:09:07.858 [main] INFO  org.restheart.Bootstrapper - URI /tokens bound to service authTokenService, secured: false, uri match PREFIX
restheart-1  |  17:09:07.858 [main] INFO  org.restheart.Bootstrapper - URI /roles bound to service roles, secured: true, uri match PREFIX
restheart-1  |  17:09:07.859 [main] INFO  org.restheart.Bootstrapper - URI /ping bound to service ping, secured: false, uri match PREFIX
restheart-1  |  17:09:07.863 [main] INFO  org.restheart.Bootstrapper - Available processors: 6, IO threads (auto detected): 6, worker scheduler parallelism (auto detected): 9, worker scheduler max pool size: 256
restheart-1  |  17:09:08.118 [main] INFO  org.restheart.Bootstrapper - Pid file /var/run/restheart-0.pid
restheart-1  |  17:09:08.121 [main] WARN  o.r.m.h.changestreams.Activator - Cannot enable Change Streams: MongoDB is a standalone instance and Change Streams require a Replica Set.
restheart-1  |  17:09:08.124 [main] WARN  o.r.m.h.sessions.TxnsActivator - Cannot enable Transactions: MongoDB is a standalone instance and Transactions require a Replica Set.
restheart-1  |  17:09:08.139 [main] INFO  org.restheart.Bootstrapper - RESTHeart started
The next steps assume that RESTHeart is running on localhost with the default configuration: the restheart database is bound to /, and the user "admin" exists with the default password "secret".
2. Create the Database
Verify that httpie is installed correctly:
$ http --version
3.2.4
Then use the PUT verb to bind the restheart database to /:
http -a "admin:secret" PUT :8080/
HTTP/1.1 200 OK
Access-Control-Allow-Credentials: true
Access-Control-Allow-Origin: *
Access-Control-Expose-Headers: Location, ETag, Auth-Token, Auth-Token-Valid-Until, Auth-Token-Location, X-Powered-By
Auth-Token: 5cepnnb9d7k45ob3erlmn183x450mexwes6i938bsnbw0bzzyd
Auth-Token-Location: /tokens/admin
Auth-Token-Valid-Until: 2023-10-05T09:23:17.535887832Z
Connection: keep-alive
Content-Length: 0
Content-Type: application/json
Date: Thu, 05 Oct 2023 09:08:17 GMT
ETag: 651e7d01fd19df010a6eb1e2
X-Powered-By: restheart.org
Note the complete list of HTTP headers returned by RESTHeart's response. The next examples will omit them for more clarity.
3. Create the inventory Collection
The examples in this tutorial utilize the inventory collection under the restheart database. To create this collection, run:
http -a "admin:secret" PUT :8080/inventory
HTTP/1.1 201 Created
...
4. Insert Multiple Documents to Populate the Collection
To populate the inventory collection, create an inventory.json file with the following content (a JSON array of documents), or just download it from <a href="/en/blog/posts/ferretdb-tutorial/inventory.json" download="">here</a>.
[
   { "item": "journal", "qty": 25, "size": { "h": 14, "w": 21, "uom": "cm" }, "status": "A" },
   { "item": "notebook", "qty": 50, "size": { "h": 8.5, "w": 11, "uom": "in" }, "status": "A" },
   { "item": "paper", "qty": 100, "size": { "h": 8.5, "w": 11, "uom": "in" }, "status": "D" },
   { "item": "planner", "qty": 75, "size": { "h": 22.85, "w": 30, "uom": "cm" }, "status": "D" },
   { "item": "postcard", "qty": 45, "size": { "h": 10, "w": 15.25, "uom": "cm" }, "status": "A" }
]
Then POST the file to RESTHeart:
cat inventory.json | http -a "admin:secret" POST :8080/inventory
HTTP/1.1 200 OK
...

{
    "deleted": 0,
    "inserted": 5,
    "links": [
        "/inventory/651e8084fd19df010a6eb1e8",
        "/inventory/651e8084fd19df010a6eb1e9",
        "/inventory/651e8084fd19df010a6eb1ea",
        "/inventory/651e8084fd19df010a6eb1eb",
        "/inventory/651e8084fd19df010a6eb1ec"
    ],
    "matched": 0,
    "modified": 0
}
5. GET All Documents
Let’s retrieve all documents in a row. For this, we send a GET request to the entire collection:
http -a "admin:secret" GET :8080/inventory
HTTP/1.1 200 OK
...

[
    {
        "_etag": {
            "$oid": "651e8084fd19df010a6eb1e7"
        },
        "_id": {
            "$oid": "651e8084fd19df010a6eb1ec"
        },
        "item": "postcard",
        "qty": 45,
        "size": {
            "h": 10,
            "uom": "cm",
            "w": 15.25
        },
        "status": "A"
    },
    {
        "_etag": {
            "$oid": "651e8084fd19df010a6eb1e7"
        },
        "_id": {
            "$oid": "651e8084fd19df010a6eb1eb"
        },
        "item": "planner",
        "qty": 75,
        "size": {
            "h": 22.85,
            "uom": "cm",
            "w": 30
        },
        "status": "D"
    },
    {
        "_etag": {
            "$oid": "651e8084fd19df010a6eb1e7"
        },
        "_id": {
            "$oid": "651e8084fd19df010a6eb1ea"
        },
        "item": "paper",
        "qty": 100,
        "size": {
            "h": 8.5,
            "uom": "in",
            "w": 11
        },
        "status": "D"
    },
    {
        "_etag": {
            "$oid": "651e8084fd19df010a6eb1e7"
        },
        "_id": {
            "$oid": "651e8084fd19df010a6eb1e9"
        },
        "item": "notebook",
        "qty": 50,
        "size": {
            "h": 8.5,
            "uom": "in",
            "w": 11
        },
        "status": "A"
    },
    {
        "_etag": {
            "$oid": "651e8084fd19df010a6eb1e7"
        },
        "_id": {
            "$oid": "651e8084fd19df010a6eb1e8"
        },
        "item": "journal",
        "qty": 25,
        "size": {
            "h": 14,
            "uom": "cm",
            "w": 21
        },
        "status": "A"
    }
]
Note: RESTHeart's API supports automatic pagination of long JSON responses using the parameters page and pagesize. For example, to get the first page made of 10 items:
http -a "admin:secret" GET :8080/inventory\?page\=1\&pagesize\=10
6. Query Documents with Filters
It’s possible to apply a filter at the end of the request to query for specific documents. The following request asks for all documents with a "qty" property greater than 75, using the MongoDB's query syntax.
http -a "admin:secret" GET :8080/inventory\?filter\='{"qty":{"$gt":75}}'
HTTP/1.1 200 OK
...

[
    {
        "_etag": {
            "$oid": "651e8084fd19df010a6eb1e7"
        },
        "_id": {
            "$oid": "651e8084fd19df010a6eb1ea"
        },
        "item": "paper",
        "qty": 100,
        "size": {
            "h": 8.5,
            "uom": "in",
            "w": 11
        },
        "status": "D"
    }
]
7. Insert an additional document
Now we are going to add a new document to the inventory collection using the POST verb:
$ echo '{"item": "newItem", "qty": 10, "size": { "h": 2, "w": 4, "uom": "cm" }, "status": "C"}' \
| http -a "admin:secret" POST :8080/inventory
HTTP/1.1 201 Created
Access-Control-Allow-Credentials: true
Access-Control-Allow-Origin: *
Access-Control-Expose-Headers: Location, ETag, Auth-Token, Auth-Token-Valid-Until, Auth-Token-Location, X-Powered-By
Auth-Token: 5cepnnb9d7k45ob3erlmn183x450mexwes6i938bsnbw0bzzyd
Auth-Token-Location: /tokens/admin
Auth-Token-Valid-Until: 2023-10-05T10:03:38.327437695Z
Connection: keep-alive
Content-Length: 0
Content-Type: application/json
Date: Thu, 05 Oct 2023 09:48:38 GMT
ETag: 651e8676fd19df010a6eb1f2
Location: http://localhost:8080/inventory/651e8676fd19df010a6eb1f3
X-Powered-By: restheart.org
Note the Location header in the response contains a link to the newly created document. The above string 651e8676fd19df010a6eb1f3 is the actual unique ID of the newly inserted document (in your case it will be different, of course) automatically created by RESTHeart.
To get the document you can directly copy that link and use it in a subsequent query. For example:
http -a "admin:secret" GET http://localhost:8080/inventory/651e8676fd19df010a6eb1f3
8. PUT a new document
POST will create a new document using the ID automatically provided by the database. However, it’s possible to instead PUT a document into the collection by explicitly specifying the document ID at the end of the request. iIn this case we need to add the query parameter ?wm=upsert since PUT default write mode is update:
$ echo '{ "item": "yetAnotherItem", "qty": 90, "size": { "h": 3, "w": 4, "uom": "cm" }, "status": "C" } \n' \
| http -a "admin:secret" PUT :8080/inventory/newDocument\?wm\=upsert
HTTP/1.1 201 Created
...
You can get this specific document using the newDocument ID, like this:
http -a "admin:secret" GET :8080/inventory/newDocument
9. Update a document
To update the document identified by the newDocument ID in the collection we are using the PATCH verb.
$ echo '{ "qty": 40, "status": "A", "newProperty": "value" }' \
| http -a "admin:secret" PATCH :8080/inventory/newDocument
HTTP/1.1 200 OK
...
To check the modifications:
http -a "admin:secret" GET :8080/inventory/newDocument
HTTP/1.1 200 OK
...

{
    "_etag": {
        "$oid": "651e8cd0fd19df010a6eb1f9"
    },
    "_id": "newDocument",
    "item": "yetAnotherItem",
    "newProperty": "value",
    "qty": 40,
    "size": {
        "h": 3,
        "uom": "cm",
        "w": 4
    },
    "status": "A"
}
The last request changes the document created in the previous example as indicated in the request body.
10. Delete a document
To delete a document we use the DELETE verb:
http -a "admin:secret" DELETE :8080/inventory/newDocument
HTTP/1.1 204 No Content
...
If we try to GET the deleted document, RESTHeart returns an HTTP 404 "Not Found" error:
http -a "admin:secret" GET :8080/inventory/newDocument
HTTP/1.1 404 Not Found
...

{
    "http status code": 404,
    "http status description": "Not Found",
    "message": "document 'newDocument' does not exist"
}
11. Get the size of a collection
To count the number of documents in a collection, use the _size resource:
http -a "admin:secret" GET :8080/inventory/_size
It returns a JSON document like this:
HTTP/1.1 200 OK
...

{
    "_size": 6
}
Conclusion
In this tutorial, we've explored how to set up and use FerretDB + PostgreSQL as a MongoDB-compatible database, and we've demonstrated how to interact with it using RESTHeart's REST API. This combination provides a versatile and robust alternative to traditional MongoDB setups, offering the flexibility and familiarity of MongoDB while leveraging the power of PostgreSQL for storage and management.